If you’ve ever wondered how streamers get those fancy Twitch alerts to pop up whenever one of their viewers, donates, follows, or subscribes, then wonder no more!
In this easy-as-pie tutorial, I’ll be showing you how to get those same alerts showing up on your stream using TwitchAlerts, and OBS.
TwitchAlerts isn’t the only way to get your new follower, donator, or subscriber notifications to show up during your stream, but it’s one of the easiest, and most popular methods. But if for whatever reason you don’t want to or can’t use TwitchAlerts I’ll be creating tutorials on how to accomplish the same effect using the other apps like TeeBoard, TNotifier and more.
So stay tuned for those (or just contact me directly and I’ll help you out)
Anyways, let’s begin this guide on how to set up TwitchAlerts with OBS.
I’m going to assume you already have Open Broadcast Software (OBS) installed. If you don’t – grab it here.
TwitchAlerts Video Tutorial:
Step 1 Download CLR Browser Source Plugin
There’s a plugin for OBS, called, CLR Browser Source Plugin. We’ll need that…
So head over to this link, and download the appropriate files based on whether you’re using the 32bit, or 64bit version of OBS.
Once you’ve downloaded the plugin, you’ll need to extract the files into the plugins folder found under C:\Program Files\OBS\Plugins for 64bit and for C:\Program Files (x86)\OBS\Plugins for 32bit.
side note: Make sure you’re actually using the version of OBS you think you’re using. In my case, I thought I was using the 64bit version of OBS, so naturally I downloaded and extracted the CLR plugin into the 64bit folders, but for some reason the plugin wasn’t showing up in my OBS sources.
After about an hour of frustration and trying to Google my way out of this problem, I finally figured out that when I first installed OBS, the shortcut it gave me on my desktop was actually for the 32bit version…. so all this time I’d been using the 32bit without even knowing.
To fix this issue, all I had to do was go into the 64bit OBS folder, find the launch icon and replace it with the 32bit shortcut on my desktop. Now it opens up the correct 64 bit version and I can see the CLR Browser Source Plugin just fine. Derp.
So ya, make sure you’ve downloaded and extracted the plugin into the correct plugins folder, and make sure you’re actually using the version of OBS that you think you are :P. You can verify this by looking for the 32bit or 64bit at the top of the OBS window.
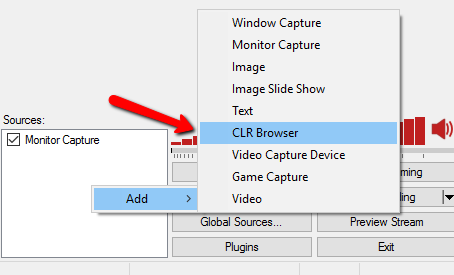
And then to make sure you’ve got everything working correctly – open up OBS, and under Sources, right click>Add, and you should see the CLR Browser in that list.
Step 2 Connect Your Twitch Account With TwitchAlerts
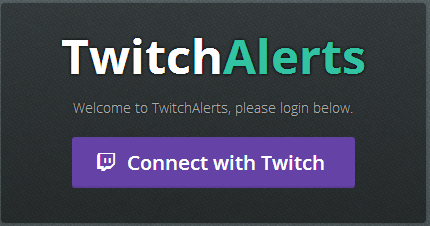
Alright if this is your first time using TwitchAlerts, you’ll need to connect your Twitch account with their app.
Simply head over to their website here – click the green Launch TwitchAlerts button on the top right, and then click the purple Connect with Twitch button.

Once you’ve connected your account, you’ll be taken to their dashboard. On the left-hand side of that page you’ll see a menu with a bunch of options – click the Alert Box button, under Stream Widgets.
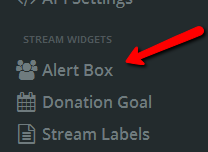
Now you’ll find yourself in front of a bunch of settings for your notifications. They’re all pretty self-explanatory so I won’t waste your time going through each individual setting.
In this tutorial we’re going to be using the Follow Alerts – so play around with the settings for a bit until you come up with something you think would look cool on your stream.
If you need a TwitchAlert image, you can head over to our premade Twitch Alert selection here, where you’ll find plenty of options.
Once you’ve figured out how you want your Follow Alert to look, it’s time to test it out!
Step 3 Testing TwitchAlerts
In order to test your new TwitchAlert, look for the LAUNCH button near the top of the page in the Alert Box settings.

Click it, and you’ll see a new, bright green window open up.
Now to test your Follow Alert, click the Test Follow Alert button found under Alert Previews.

You should now see the alert that you created pop up in the green window!
Chances are you didn’t get all the settings down perfect your first try, so play around with the settings until you get your Follow Alert just they way you want it. (make sure to hit Save after you’ve made the changes in order for the tests to show up accurately).
Once you’ve perfected the look of your Follow Alert, we can now set up TwitchAlerts with OBS.
Step 4 Adding Your TwitchAlerts To OBS
Begin by opening up OBS, then with a scene already created, right-click under sources > Add > CLR Browser.

If you don’t see the CLR Browser option, make sure you downloaded and extracted the plugin correctly like explained in Step 1. If you did and you’re still running into issues just leave a comment below this guide and I’ll help you out.
When you click the CLR Browser option, a window will pop up.
You’ll see an option to add a URL – so what we wanna do is head back over to your TwitchAlerts Dashboard and copy that URL you see that’s in the Alert Box widget. It’ll be at the top, next to where you hit the LAUNCH button earlier.

Once you’ve copied that URL, paste it in the CLR Browser Configuration window where it says URL, then hit OK.
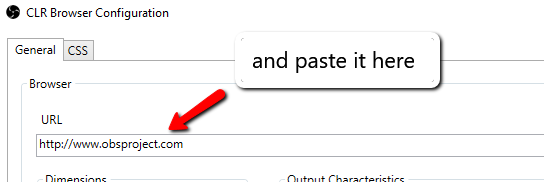
Now we want to see how the Twitch Alert looks…
Click Preview Stream in OBS and then go back and click that Test Follow Alert button in your TwitchAlerts dashboard. You should see the Follow Alert popup in your OBS preview.
If you wanna move it around or resize it, simply hit the Edit Scene button and click and drag it to your desired spot.
And that’s it! You now know how to set up TwitchAlerts with OBS.
Common Questions about setting up TwitchAlerts with OBS
Do I always need to have the green TwitchAlerts window open while streaming in order to receive the notifications?
Nope! It’ll work just fine without that extra window.
Do I need to add a new CLR Browser source in OBS for each type of notification? (new follower, subscriber, donation).
Nope! Once you’ve created that first CLR Browser source, you’ll receive all of your TwitchAlerts notifications through that one. (unless you want them to show up in different areas – see below).
How do I make it so my new follower alerts show up in one area of my stream, and my new donation/subscriber alerts show up in a different area?
Easy! In your Alert Box settings in TwitchAlerts you’ll see checkboxes at the top found under How To for each type of notification.
So what you wanna do is uncheck all of them except for the one you want displayed in a specific area on your stream. This will change the URL below that you paste in your CLR Browser Source plugin.

Copy and paste this new URL in your CLR Browser Configuration and then hit OK.
Now repeat this same process for the other notification(s) you want to show up in your steam. But this time you need to add a new CLR Browser Source for each notification, and paste that unique URL in each one.
Then to move the alerts in separate locations, just hit Edit Scene while selecting the appropriate CLR Browser Source and move them around!
That’s Everything
If you have any other questions or problems I didn’t cover in this guide, then please leave a comment below and I’ll help you out.
And if you’re in the market for new Twitch alerts graphics, or any new graphics for your stream, then you can check out our premade alerts here – and other graphics like overlays, panels, offline screens, etc… here!
